Thursday 19 May 2016

OneDrive Integration with Dynamics CRM 2016 Online

For configuring OneDrive login to office portal

1. Go to portal office page, Select OneDrive icon


2. Below screen displayed


    3. Click Next, go to below screen


  4. Click 'Your One Drive is Ready'.


 5. Enable sharepoint integration before going to next step. 

6. Go to CRM online, ‘Settings’ >> ‘Document Management’ >> ‘Enable One Drive for Business’ and click OK.


 7. On Enable Document Management Page shows one more option 'OneDrive For Business Folder Settings'


 8. Click on 'OneDrive For Business Folder Settings', a window displayed with folder name. One can change this folder name.


9. For uploading any document to One drive through CRM, Open any entity say Accounts and go to Document.


10. Click Upload button to upload document.


11. File will upload successfully and it will show in crm.


12. Uploaded document will show up in Onedrive on clicking Open Location.


Hope this will help you all....

Friday 13 May 2016

Plugin Debugging using Profiler in CRM 2016

Steps for Debugging:


  1. Connect to CRM with SDK plugin registration tool.
  2. Install the profiler by clicking 'Install Profiler'.

   3. A new branch is added to Register Plugin and workflow activities.


4. Select a plug-in step and click Start Profiling in the toolbar to begin profiling. Below screen pop up, click OK.


5. Perform the operation in CRM that causes the plug-in to run.


 6. Click on Download Log File button to save the ErrorDetails.txt file on  computer.

7. Open the plug-in solution in Visual Studio and go to Debug  --> Attach Process and select       
    PluginRegistration.exe, Click Attach button.


8. In Plug-In Registration Tool, click the Debug button. Select ErrorDetails.txt for the profile location and browse assembly location to debug.


10.  Click the Start Execution button, and debugging will start in Visual Studio.


MS DYnamics plugin Event execution pipeline

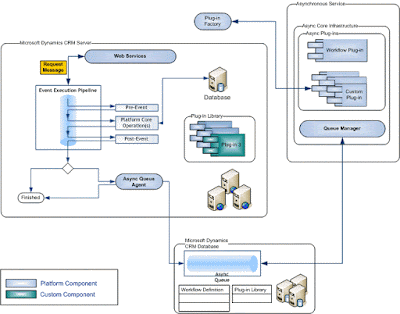
The following figure illustrates the overall architecture of the Microsoft Dynamics CRM platform with respect to both synchronous and asynchronous event processing.

Synchronous and Asynchronous Event Processing Diagram

MS Dynamics CRM Plug-In Deployment

To deploy Plugin sign the assembly with a strong-name key file and register the plugin.

1. Go to Project properties.


2. Go to the Signing tab, and check the Sign the Assembly check box. Enter name of new key(password is optional) and click OK.


Stong name key will be added to solution explorer of project.

Plugin deployment can be done in 2 ways programmatically and through SDK toolkit found at location '..\sdk2016\SDK\Tools\PluginRegistration'.


1. Run exe of pluginRegistration tool.


2. Click on Create New Connection --> Enter login region, Name and password--> Click Login button.


3. After login below screen shown up.


4. Register--> Register new assembly.


5. Browse the dll and click 'Load Assembly' button and click OK.


6. When the assembly is registered, a confirmation window appears.


7. Expand the registered assembly.


8. Registered assembly must registered with an event and entity.

9. Click Register--> Register New Step Menu.

10. Register a step (and select the entity and event), enter a message in the Message text box.


11. New Step will be added.

Thursday 12 May 2016

MS Dynamics CRM Plug-In Development


  • To develop a plug-in, download the Microsoft Dynamics CRM 2016 SDK
  • Create new class library project in VS

  • Add reference of 2 dll
              1. Microsoft.Xrm.Sdk.dll
              2. Microsoft.Crm.Sdk.Proxy.dll
  • Adding Refrence
  1. Solution Explorer --> select the project name --> Rightclick and select the Add Reference menu option

   2. Click the Browse button.
   3. Locate the SDK\Bin folder on your local drive and select both Microsoft.Xrm.Sdk.dll and
       Microsoft.Crm.Sdk.Proxy.dll files.


   4. Added dll will show under Refrence folder.


5. Add namespace and implement IPlugin interface.


6. In the case of the IPlugin interface,  implement the Execute method is must.

  public class Class1:IPlugin 
    {
        #region IPlugin Members
        public void Execute(IServiceProvider serviceProvider)
        {
            throw new NotImplementedException();
        }
        #endregion
    }

Wednesday 11 May 2016

Overview of Plugin

A plug-in is custom business logic written in .NET that can integrate with Microsoft Dynamics CRM. Using plug-ins, you can fire a custom action or event on any entity
Plug-ins are set of events and run when any associated events occur. These events occur on specific condition without any user interface.


Microsoft Dynamics CRM Online, plug-ins must be registered in the sandbox.


Stages

You can set up plug-ins in the pre-stages (either pre-validation or pre-operation) or post-stages (postoperation):

Pre-Stage—Sends control to the plug-in before the real event is executed in the core system.
For example, you might attach a plug-in to the Create event of the Account entity; your code
would execute before the Account was actually created in the CRM system. With this method,
you could prevent the Account or the entity record from being created.

Post-Stage—Executed after the real event has executed in the core system. So, following the
example just described, your code would be executed only after the Account record has been
created.

These stages are participate in SQL transactions as well. So, one can use the pre-stage outside or inside a transaction, and you can do the same for the post-stage.

              The concept of using transactions now allows the rollback of a plug-in operation. If you have two different plug-ins attached to the same message of an entity and the second plug-in fails, it can now roll back the successful operation performed by the first plug-in.

           To check whether the plug-in is running in a transaction by checking the IsInTransaction property of the IPluginExecutionContext.

 The stages 20 (preoperation) and 40 (post-operation) are the ones that guarantee to be part of a transaction, whereas the 10 (pre-validation) might not be part of it.


=======================================================

Deployment Types

A plug-in in three different ways:
Server—Means that the plug-in will execute on the server. Execution will occur when users
use the web client or the Outlook Online client as well as when any workflow is executed.
Offline—Means the plug-in executes on the client’s user machine where Outlook is running.
This proves especially useful when running the Outlook client in offline mode.
Both—Executes the plug-in on the server and in the Outlook client in offline mode. Keep in
mind that the plug-in would be executed twice, once when Outlook is offline and again when it
connects to the server.
Tip
To prevent the plug-in from executing twice because of synchronization, check the
IsOfflinePlayback property of IPluginExecutionContext.

Wednesday 4 May 2016

Marketing Lists

It helps to create lists of potential customers or existing customers for marketing purposes. There are two types of list:

Dynamic Marketing List is to return a list of members dynamically when needed, based on search criteria you set.  Whenever a new record is created or updated and meets the criteria of the marketing list query, it will automatically be added to the marketing list.


Static Marketing List is used to add and update members manually.

A marketing list can only contain members from one of the following record types: Lead, Contact, or Account. You cannot have members from two different record types in one list.


Create a marketing list

  1. Go to Marketing > Marketing Lists


  2. Click New.
  3. In Summary area, Fill required fields and add or change the information.
  4. Click on Save.

Add members to a marketing list

1. In any marketing list record, in the Members area, click the Add button.


2. Manage Members dialog box displayed, select one of the following options, and then click Continue.


3. Select desired records and click add, Members will be added to marketing list. 

4. Add  campaign or quick campaign which you want to associate to newly created marketing list.